Basic Bread Recipe
If you like making your own bread, you'll like this recipe for making basic bread
Servings: 1 loaf
Ingredients
- ¾ oz active dried yeast
- 1 pinch sweetener consisting of sugar spoonful of honey or dark corn syrup (just to kick-start the yeast)
- 2 cups warm water about 115 degrees, F, is good
- 2 pounds bread flour
- 1 tablespoon salt
- extra flour for dusting
Instructions
- Mix the sweetener with the warm water until dissolved.
- Add the yeast, and stir again, until dissolved.
- Combine the salt with most of the flour - leave out about 6 ounces or so.
- In the bowl of a large capacity heavy duty stand mixer (or in a bowl or even on the table for you purists), mix the water into 1 pound of the salted flour until well combined. Mix well to start incorporating air. This step will assist in the final rise you will get.
- Add the rest of the salted flour, and mix again until the flour is incorporated.
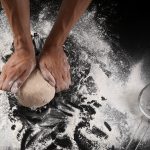
- At this point, turn out the dough if you're doing it by hand. Knead in as much of the remaining flour as is necessary to achieve a smooth, non-sticky, not to wet or dry dough. Knead by hand or with the dough hook until the dough is very smooth and elastic and passes the windowpane test.
Fermentation Stage
- Shape your dough into a smooth ball and let it rest, covered, in a warm place in a greased bowl until it has doubled in bulk. (Turn the dough in the bowl so all sides are greased, and let it rise smooth side up). When you poke your finger into the side of the dough and the dough doesn't spring back at all, you'll know you're there.
- How long it takes depends on the temperature of the room, the temperature of the dough, the barometric pressure outside - lots of factors. A reasonable rule of thumb is give or take about 1 ½ hours. You can do this step on the countertop or in any draft-free place. On top of the fridge is good, since heat rises, it's probably a little warmer up there.
- I've also done this step in a cold oven with the oven light on. Remember, though, the longer you can draw this out, the better the bread will be. If you have the time, a longer time at a cooler temperature is fantastic, say 3 hours at 68 degrees F.
Benching Stage
- Roll the dough out of the bowl onto a surface very lightly dusted with flour and press out all the gasses. Now, decide whether you are making one jumbo loaf, two loaves (either in pans or just rounds) or rolls.
- Divide the dough accordingly, or leave it in one piece. Form each piece (again, it's up to you how many) into a round, cover with a clean, lint free towel or even some plastic wrap, and let rest for a few minutes.
Shaping Stage
- Shape each piece however you want. If you are making a round loaf, round your dough on the table. You've probably seen bakers do this on TV and this is how to do it: take your ball of dough and place it on the table in front of you. Cup your hands around the dough on either side of the dough ball, with the pinky side of your hands touching the table. Without lifting your hands, begin to firmly push the ball in circles on the table.
- You can do this slowly or quickly. The end result will be the same, although you will get faster with practice. The friction between the bottom of the dough and the table should cause your dough ball to smooth and tighten. This will allow for a more even rise and a prettier loaf. If you're not getting any traction on the table, smear a bit of water on the table - just enough to make it a little damp, but not wet.
- If you're making a pan loaf, press out your dough and stretch it into a rough rectangle whose long sides are as long as your pan. Roll the dough up fairly tightly jelly-roll style, tuck the end under and place they cylinder of dough, seam side down, into your pan. Shape your rolls however you want.
Proofing Stage
- Put your rolls or loaves on or in whatever you'll use to bake them - baking stone, cookie sheet, loaf pan. Cover them with a clean, lint free towel or a piece of plastic wrap and let them double again. Since the yeast have been happily multiplying in your dough all this time, it will take about half the time it took during the fermentation period.
- Preheat your oven during the proofing time to 375 degrees, F.
Ready to Bake
- When you're ready to bake, if you want to, you can slash the tops of your loaves with a very sharp knife. This is generally done for appearances, although it can boost the final rise in the oven (oven spring - the impressive rise you get during the first few minutes in the oven, before the crust sets), and help to keep the crust from stretching and tearing in the oven.
- Your bread is done when it is a lovely golden brown color, when it sounds hollow when you tap it on the bottom, and when the internal temperature has reached 200-210 degrees, F. This could take as little as 10-15 minutes for small rolls and upwards of half an hour for large loaves. When you can smell the bread and it is starting to look done, start checking.
- Once the bread is out of the oven, let it cool on a rack - if you have panned the bread, take it out of the pan to avoid having a soggy loaf.
- Cool to room temperature, then store in a paper bag at room temperature.
Notes
Since this bread contains no preservatives, keeping it around for more than a day can be an issue. If you know you won't plow through all of it in a day, slice the loaves once they are cool, and store them in freezer bags in the freezer. That way, you can pop out a piece or two to make a sandwich. It defrosts in no time.
Be sure to check out my web site for How To Make Bread.