Simple Rump Roast Beef Recipe
When you crave a hearty, comforting meal, nothing beats a classic roast beef dinner. With a simple rump roast, a medley of vegetables, and a few aromatic herbs, you can create a dish that fills your home with mouthwatering aromas and brings everyone to the table.
In this recipe, I show you how to prepare a basic roast beef that’s full of rich flavor, with tender meat and perfectly roasted vegetables.
You’ll start with a well-seasoned rump roast, which offers the ideal balance of lean meat and marbling for slow roasting. Alongside the beef, you’ll roast a colorful mix of potatoes, Brussels sprouts, onions, carrots, and garlic. Fresh rosemary adds an earthy fragrance that ties all the flavors together beautifully.
This dish doesn’t require fancy techniques—just good ingredients, a hot oven, and a little patience. The result: juicy slices of roast beef surrounded by caramelized vegetables, perfect for any family dinner or casual gathering.
Whether you’re new to roasting or looking for a dependable, go-to recipe, this basic roast beef delivers. Follow the steps below and enjoy a meal that’s both simple and satisfying. Let’s get started!
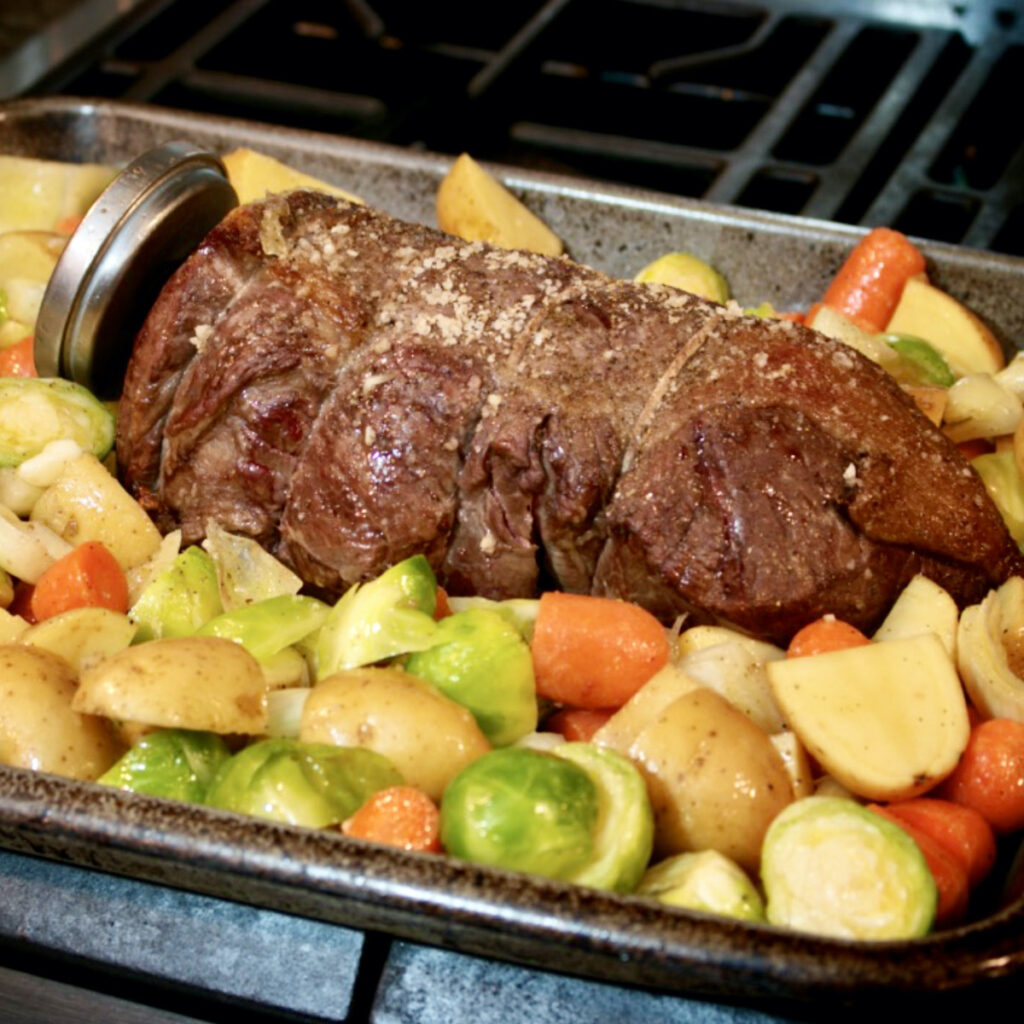
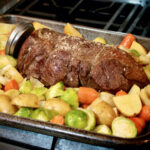
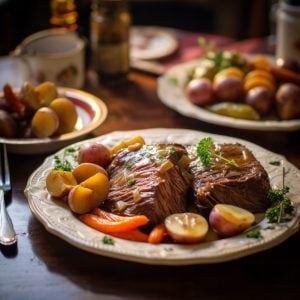
Basic Roast Beef Recipe
Ingredients
- 12 small potatoes halved or quartered
- 12 Brussels sprouts cut in half
- 3 small onions coarsely chopped
- 3 carrots peeled & quartered
- 6 garlic cloves peeled
- olive oil
- salt & pepper to taste
- 3 pounds rump roast
- 3 sprigs fresh rosemary
Instructions
- Make sure you take the rump roast out of the refrigerator at least one hour before you plan to start cooking it. You want to get the meat as close to room temperature as possible.
- 15 minutes before you plan to put the roast in the oven preheat your oven to 450°F and get your roasting vegetables prepped by cutting them up, season with salt & pepper and combine in a big bowl. Add some olive oil and give them a stir with a spoon or your hands if you like that sort of thing.
- Remove the roast from its packaging. I suggest you do this over the sink to avoid any unnecessary mess from the juices. Pat the rump roast dry with paper towels and generously season with salt & pepper. Some people like to make a bunch of slits in the meat and place slivers of garlic into each cut. Great idea, one I'll try next time.
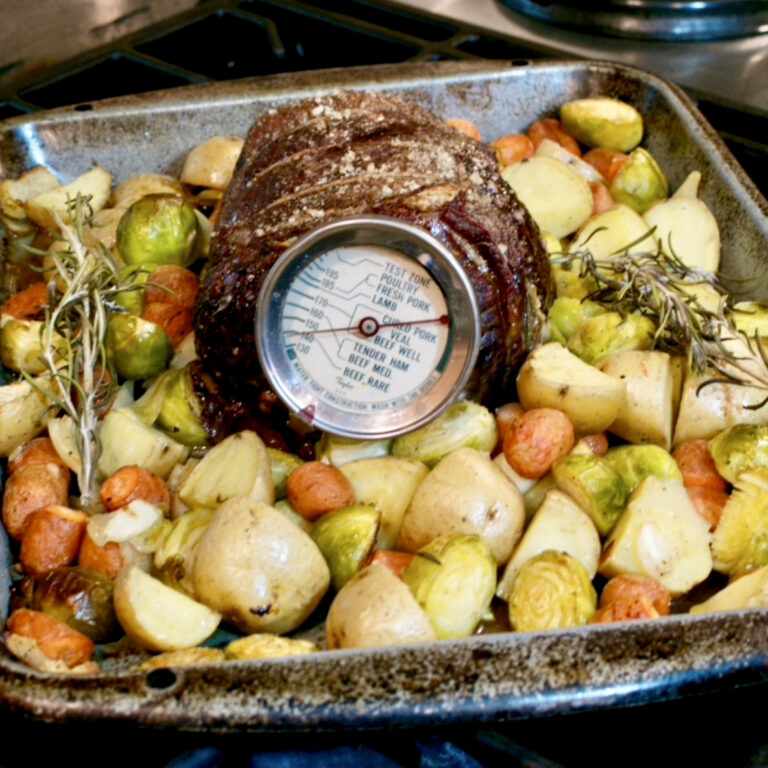
- Place the roast fatty side up on a roasting pan large enough to hold the beef and vegetables. If you don't have a pan big enough, use two separate pans. I have seen some people suggest putting the roast directly on the oven rack with a pan underneath to catch the drippings.Another great idea allowing the oven's hot air to circulate around the meat eliminating the need to rotate the roast while cooking. I don't want to have to clean the oven rack so I use a pan.
- Add the vegetables to the pan and stick a meat thermometer into the end of the roast, right in the middle.
- Add the sprigs of fresh rosemary on and around the meat. Place the roasting pan into the oven on a lower rack and roast at 450°F for 20 minutes to brown the meat.
- Reduce the heat to 300°F and continue cooking until the meat reaches the desired temperature and the vegetables are cooked.How long this takes will vary depending on the size of your roast, the type of oven you have, the amount of vegetables you're preparing and several more factors. Some people will tell you 20 minutes per pound, others 10 minutes per pound. I suggest you estimate somewhere between the two but use a meat thermometer and keep your eye on it.
- If the meat is done but the vegetables are not, remove the meat and transfer to a cutting board and place the vegetables back into the oven. Loosely cover the roast with some aluminum foil while it rests for 5 to 10 minutes.If the vegetables are done but the meat has not yet reached its desired temperature, transfer the vegetables to a bowl, cover with foil or clear wrap and return the roasting pan back into the oven.
- When the meat is done and rested and the vegetables are ready to go, thinly slice the beef and serve with a plateful of roasted vegetables.
Step-By-Step Instructions
Detail | Description |
Type of Meat | Rump Roast, Top Round, Sirloin Tip Roast, Ribeye Roast — choose based on budget and desired tenderness/flavor. |
Seasoning | Generously season meat with salt, pepper, garlic, rosemary, and olive oil. Optional: marinate 2–12 hours for more flavor. |
Oven Preheat | Preheat oven to 450°F (for initial sear), then reduce to 325°F–350°F for roasting. |
Oven Position | Place roast on rack in roasting pan, in center of oven for even heat circulation. |
Cooking Temperature | Start 450°F for 10–15 mins to brown, then roast at 325°F–350°F until desired doneness. |
Internal Temp for Doneness | Medium Rare: 130–135°F; Medium: 135–145°F; Medium Well: 145–150°F; Well Done: 155°F+. Use a meat thermometer. |
Resting Time | Rest 15–20 minutes after roasting, loosely tented with foil. This lets juices redistribute. |
Slicing Thickness | Slice thinly across the grain (about 1/8–1/4 inch thick) for tender, juicy servings. |
Serving Suggestions | Serve with pan juices or gravy, alongside roasted potatoes, carrots, Brussels sprouts, and onions. |
Storage | Refrigerate leftovers up to 4 days. Reheat gently to retain moisture. Slices are great for sandwiches! |
Roasting Times By Weight
These are estimated roasting times by weight and desired doneness. This assumes you’re roasting at 325°F after the initial 10–15 minute sear at 450°F:
Always use a meat thermometer for accuracy—ovens can vary!
Check temp about 10 minutes before expected doneness to avoid overcooking.
Rest the roast 15–20 min before slicing for the juiciest results.
Roast Weight | Medium Rare (130–135°F) | Medium (135–145°F) | Medium Well (145–150°F) | Well Done (155°F+) |
2 lbs | 35–45 min | 45–55 min | 55–65 min | 65–75 min |
3 lbs | 50–65 min | 65–75 min | 75–85 min | 85–95 min |
4 lbs | 65–80 min | 80–95 min | 95–105 min | 105–115 min |
5 lbs | 80–100 min | 100–115 min | 115–125 min | 125–135 min |
6 lbs | 100–120 min | 120–135 min | 135–145 min | 145–155 min |
Best Cuts of Beef to Roast
Several cuts of beef work well for making roast beef, but each delivers a slightly different texture and flavor. The best cuts strike a balance between tenderness, beefy flavor, and affordability. Here are a few top choices:
Rump Roast — Cut from the top of the hindquarters, the rump roast offers excellent flavor and a fine grain. It’s leaner than some other cuts but remains tender when roasted properly. Its uniform shape makes it easy to slice thin, which is ideal for roast beef. This is one of the best choices for a classic, no-fuss roast beef dinner.
Top Round (London Broil) — Another lean, affordable cut. It’s slightly less tender than rump but still flavorful, especially when cooked medium rare and sliced thin.
Sirloin Tip Roast — Taken from the round, near the sirloin, this cut has a nice beefy flavor and stays juicy if not overcooked.
Ribeye Roast — Rich, tender, and well-marbled, ribeye produces a luxurious roast beef. It’s more expensive, but worth it for special occasions.
Chuck Roast — Best for pot roast or slow braising. It’s flavorful but contains more connective tissue, making it less suited to traditional roast beef slicing.
Rump roast stands out because it’s affordable, flavorful, and slices beautifully for serving—perfect for a classic roast beef meal.
Shopping Tip – When Meat Is On Sale
When you spot a great deal on meat or chicken at the store, take advantage of it—but shop smart. Always check the labels carefully, and if you have any questions, ask the butcher. Most of the time, these sales happen because the “Best Sold By Date” is coming up soon or the store ordered too much and needs to sell the extra inventory.
Sometimes markets also run sales because they got a good deal from the distributor or are offering certain items as a loss leader to draw you into the store. Regardless of why the price is low, handle your purchase wisely: either cook it right away or vacuum seal and freeze it for later use.
Freezing meats while they are still fresh locks in flavor and texture, so you’ll have high-quality options ready for future meals. By shopping this way, you can stock your freezer and save money without sacrificing quality.

Cooking Tip – Under-Cook the Vegetables
Start roasting the meat in a hot oven for 20 minutes to brown it, then lower the heat to finish cooking. I waited until the second phase of roasting to add the vegetables, thinking they would have enough time to cook—but they didn’t. After checking other roast beef recipes, I learned that many cooks parboil the potatoes, carrots, and Brussels sprouts before adding them to the pan.
Next time, I’ll place the vegetables in the pan during the first phase of roasting. If they still need more time, I’ll consider parboiling—but I prefer to keep things simple and avoid that extra step.
Roast Beef Gravy
I didn’t make gravy the night I served this to my daughter—she was hungry, it was getting late, and she still had homework to finish. She wanted to eat right away. But if you have a few extra minutes, you can quickly prepare a delicious pan sauce from the drippings.
While many recipes tell you to make the sauce directly in the roasting pan, I prefer to use a saucepan. Yes, it means one more pan to wash, but it gives me better control and makes the process easier.
To make the sauce, scrape any drippings from the roasting pan into a saucepan set over medium-high heat. Once the drippings are hot, take the pan off the heat and deglaze it with a splash of red wine, stirring to loosen the flavorful bits.
Let the wine cook down until it’s reduced to an essence. Then add beef stock or demi-glace and simmer until the sauce thickens enough to coat the back of a spoon. To finish, whisk in a couple of tablespoons of butter for a silky texture and beautiful sheen.
Season to taste with salt and pepper, and serve alongside your roast beef.
Slicing Tip – Cut the Roast Thin
Always slice roast beef thinly—about 1/8 to 1/4 inch thick—across the grain. Cutting it thin helps keep each bite tender, even with leaner cuts like rump roast or top round.
Thick slices can become chewy, while thin slices highlight the roast’s flavor and make it easier to enjoy, especially when paired with pan juices or sauce. Use a sharp carving knife or slicing knife for the best results.
Look at the surface of the roast. Do you notice the lines running in one direction? That’s the grain. You want to slice across those lines, not along them. Cutting across the grain shortens the muscle fibers, making each bite more tender and easier to chew.
10 Responses
Just cooked this for our Christmas lunch and it worked a treat, even the kids enjoyed it. Thanks for posting onlinr!
Made the mistake of overlooking. Thought I’d cook this RUMP roast at 300°F just like I do a Chuck Roast. We’ll I was wrong.It got purdy tough. So I took the meat out and cut it up into small pieces. That really helped and now it’s really good. Just a trick I wanted to share with all you overcookers.
Hi,
Just cooked this for our Christmas lunch and it worked a treat, even the kids enjoyed it.Thanks for posting onlinr! I’ll be back to see what other tasty recipes you come up with!
I would think you would want to add some water to the pan while the roast is cooking if you use a roasting pan. I tried this and then since it wasn’t quite done before I wanted to go to bed, I put it in a crockpot to finish cooking; today I will re-add the veggies and let them sit under low in the crockpot for a few minutes.
Made this last night for dinner……BEST MEAL EVER…., ! ! Reminded me of my grandmother’s Sunday roasts
YUM YUM
Thanks Penny for letting me know.
We went out for a nice breakfast and a little shopping this morning so we skipped lunch. I will be making this roast for our Sunday dinner. To remind myself how to make a good roast with carrots & potatoes,(like Mom), I went online and picked this recipe based on the photo (this one looked exactly like the ones my Mom used to make for Sunday dinner). When I saw that brussel sprouts were suggested it was even better, something my Mom didn’t add to the potatoes and carrots, (however, I have a bag of fresh brussel sprouts that need to be cooked). Well, I will let you know how it turns out. P.S. I am going to add the vegetables in the first phase. Thanx, for all the suggestions, maybe I will be able to skip the “mistakes” phase.
Thanks for letting me know and look forward to hearing about your results.
140 is rare. 130 is raw.
I did mine.. Browned beef in glass baking dish.. This seems to make meat juicier in my opinion.. And as well I usually get a late dinner start and the meat is still frozenish… Believe it or not.. Really keeps the meat moist/ more tender. Then cut veggies.. Added corn? starch stirred veggies, put veggies in Dutch oven then topped with meat and meat juices( made up of water, Warchestershire sauce, chili sauce, dash of black coffee and some melted butter) so it makes it’s own gravy as it all finishes cooking at the same time. Thanks for posting. I was double checking half of the way through!