
Fast Answer
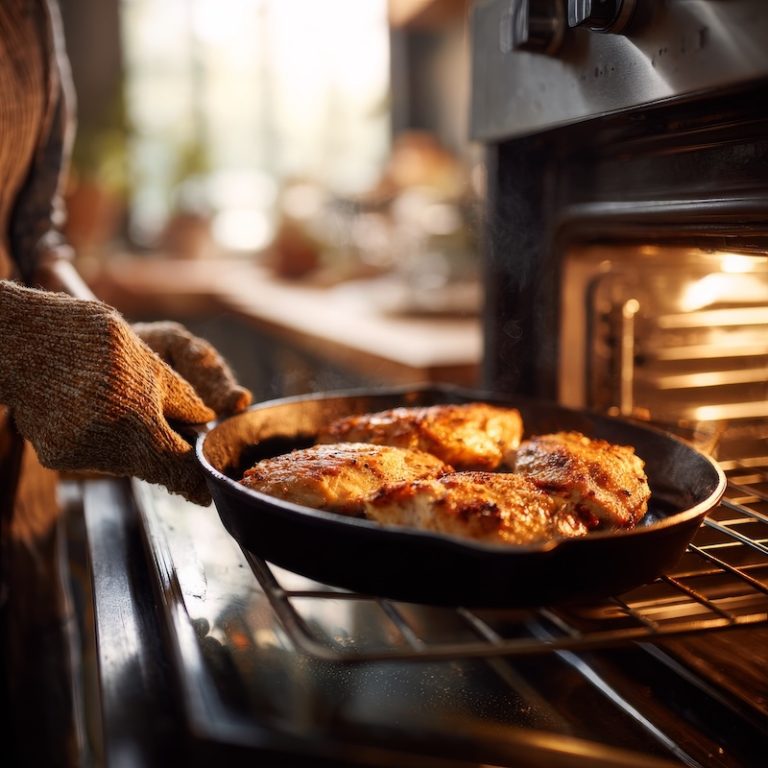
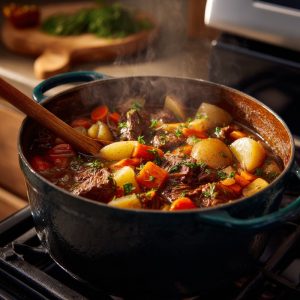
Pan roasting means searing food in a very hot oven-safe pan on the stovetop to build a crust, then transferring the whole pan into a preheated oven to finish cooking through gently and evenly. You get the crust the stovetop creates and the even internal heat only an oven provides — in a single pan, without transferring the food.
Pan Roasting Explained: Stovetop Sear, Oven Finish, Better Results
Pan roasting is the technique behind some of the best restaurant plates you’ve ever eaten — and most home cooks have never heard of it by name. It solves a real problem: the stovetop runs too hot to cook thick proteins through without burning the outside, and the oven alone can’t build the kind of crust that makes a dish worth eating.
This post walks you through the exact method, the variables you can control, and what to look and listen for so you can execute it confidently on any protein.
Start Here: Is Pan Roasting What You Need?
- This technique is for you if: You've overcooked a chicken breast trying to finish it in the pan, or pulled a steak off the grill that was charred outside and raw in the middle.
- Best for: Proteins ¾ to 2 inches thick — bone-in chicken thighs, thick pork chops, steak, salmon fillets, sea bass, duck breast, veal chops.
- Not the right tool for: Thin cutlets (they're done before the oven matters), low-and-slow braises (that's a different technique entirely), or anything delicate enough to fall apart when you flip it.
- What success looks like: A deep golden-brown crust on the outside, meat that's evenly cooked all the way through with no grey band of overcooking just under the surface, and juices that stay in the meat until you slice it.
- Equipment you need: One oven-safe heavy pan — cast iron or thick stainless steel. That's it.

How Much Heat?
I wrote an article called How Much Heat To Use When Sauteing or Pan Frying, describing how I determine when the pan is hot enough. Please check it out. I also want to share with you a warning I have in that article:
WARNING: Hot oil is hazardous and can burn you. Most home cooks rarely get their pans and the fats they cook with to the proper temperature, so if you do start heating your pans and fats to optimum levels, be very careful not to burn yourself. You should start at slightly lower levels than discussed here until you are comfortable, then take them a little higher.
Why Pan Roasting Works (The Actual Reason)
- The crust problem: Browning — the Maillard reaction — only happens above 300°F at the surface. Ovens heat air, which is inefficient at transferring heat to the food's surface. A hot pan transfers heat directly by conduction, which is far more effective at building crust fast.
- The interior problem: But high stovetop heat is uneven. The bottom surface is in contact with metal at 400°F+ while the top is exposed to air. Cook too long on the stovetop and the outside overcooks before the inside catches up.
- Why the oven solves it: Once you've built the crust, the oven surrounds the food with steady, even heat from all sides. The interior temperature rises gradually and uniformly — no hot spot, no grey overcooked band under the crust.
- The carryover effect: Even after you pull the pan from the oven, the meat continues cooking from residual heat. This is not optional physics — it's why resting matters, and why you pull the food a few degrees before your target temperature.
Think Like a Cook: Two Heat Sources, One Job Each
- The mental model for pan roasting is simple: the stovetop and the oven are not competing — they're doing two completely different jobs in sequence. The stovetop's job is surface browning. The oven's job is even internal cooking. Neither can do both well. Once you internalize that, you stop second-guessing when to make the transfer and start reading the food instead.
- This same logic extends to other techniques. Any time you want both a browned exterior and an evenly cooked interior on something thicker than an inch, you're in pan-roasting territory — whether it's labeled that way in the recipe or not.

Step-by-Step: Pan Roasting From Setup to Rest
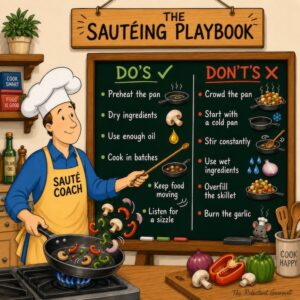
- Step 1 — Prep the protein: Pull it from the fridge 20–30 minutes before cooking. Pat completely dry with paper towels. Season generously with salt and pepper on all sides. Wet surfaces steam instead of sear — this step is not optional.
- Step 2 — Preheat the oven: 400°F for most proteins. 425°F for very thick or bone-in pieces. The oven needs to be fully up to temperature before the pan goes in — not almost there.
- Step 3 — Heat the pan: Place your cast iron or stainless pan over medium-high heat for 2–3 minutes before adding oil. Add a high-smoke-point oil (canola, avocado, grapeseed). Wait until the oil shimmers and just begins to ripple — that's your signal.
- Step 4 — Sear without touching: Lay the food away from you. Do not move it. A properly hot pan will release the food naturally when the crust has formed — typically 2–4 minutes. If it resists, it's not ready to flip.
- Step 5 — Optional butter baste: After flipping, add a knob of butter, a smashed garlic clove, and a sprig of thyme. Tilt the pan and spoon the foaming butter over the food for 30–60 seconds. This is where the flavor goes from good to memorable.
- Step 6 — Transfer to the oven: The pan goes in hot. Use oven mitts and don't forget the handle is now extremely hot — a folded towel over the handle is a useful reminder. Center rack, no cover.
- Step 7 — Cook to temperature, not time: Use an instant-read thermometer. Pull at 5°F below your target — carryover does the rest. Chicken: 160°F (carryover brings it to 165°F). Pork: 140°F. Beef medium-rare: 125–128°F. Fish: 120–125°F.
- Step 8 — Rest: Transfer to a cutting board and tent loosely with foil. 5–10 minutes for smaller cuts, 10–15 for larger. This is when the juices redistribute. Cutting too soon puts them on the board, not on the plate.
Visual Cues: What to Look and Listen For
- Loud sizzle when the food hits the pan → pan is hot enough → proceed. A quiet sizzle or no sizzle at all → pan is too cool → remove the food and heat longer before trying again.
- Food releases cleanly when you try to lift it → crust has formed, ready to flip → flip once. Food sticks and tears → crust isn't set yet → leave it another 30–60 seconds.
- Deep mahogany-brown color on the seared side → Maillard reaction is complete → ready for the oven. Pale gold or blonde color → more time on the stovetop needed.
- Edges of the protein turning opaque and white about a third of the way up → interior cooking is progressing in the oven → check temperature soon.
- Juices beginning to pool on the top surface of the meat → very close to done → check temperature immediately.
- Thermometer probe slides in without resistance → collagen and connective tissue have relaxed → good sign for doneness regardless of the number.
What Most Cooks Get Wrong
- They start with a cold or warm pan, not a hot one. This is the single most common mistake. A pan that isn't properly preheated can't build a crust — it steams the food instead. The fix is patience: heat the empty pan for 2–3 full minutes before adding oil.
- They move the food too early. Lifting and checking is natural instinct — but it tears the forming crust and causes sticking. The food tells you when it's ready by releasing on its own. Trust the process.
- They crowd the pan. Two chicken thighs and a pork chop in the same 10-inch pan drops the surface temperature immediately. Everything steams. Cook in batches if necessary — it's not slower if the first batch is actually seared.
- They skip patting dry. Surface moisture turns to steam when it hits hot fat. Steam prevents browning. This step takes 30 seconds and changes the entire result.
- They cook to time instead of temperature. Every protein, every pan, every oven is different. Time is a rough guide. Temperature is the answer. An instant-read thermometer is a $15 investment that eliminates most pan-roasting failures.
- They forget the handle is hot. This sounds obvious. It happens to experienced cooks too. Put a dry towel over the handle the moment the pan comes out of the oven — every time.
Quick Diagnosis: What Went Wrong and How to Fix It
- No crust, pale exterior → pan wasn't hot enough before food went in → next time, preheat 2–3 minutes longer; test with a drop of water — it should evaporate instantly.
- Food stuck and tore when flipping → crust wasn't fully formed, or pan wasn't properly seasoned/preheated → leave it longer before attempting to flip; a formed crust releases on its own.
- Exterior burned, interior raw → stovetop heat too high, or sear time too long before oven transfer → sear at medium-high, not maximum heat; get the crust, then move to the oven.
- Interior overcooked, dry throughout → pulled too late, or oven too hot → use a thermometer and pull 5°F early; rest properly.
- Smoke alarm went off → oil smoke point exceeded, or pan had residue → use a higher smoke-point oil; make sure the pan is clean before heating.
- Juices poured out when sliced → didn't rest long enough → 5 minutes minimum for small cuts; the rest period is not optional.
- Uneven cooking — overdone on one side, underdone on the other → pan has hot spots, likely a thin pan → switch to cast iron or a heavier stainless pan for more even heat distribution.

Quick Fixes and Tips Worth Knowing
- The butter baste isn't decoration. Adding butter, garlic, and herbs to the pan after the flip and spooning it continuously over the food builds flavor that no seasoning applied beforehand can replicate. Don't skip this step if you have 60 extra seconds.
- If the pan starts smoking heavily: Lower the heat slightly and add a small amount of fresh oil. Don't add butter until you're ready for the baste — it burns faster than you think.
- If the food looks done on the outside but the thermometer says otherwise: Reduce the oven to 375°F and give it more time. The crust won't suffer from a few extra minutes at lower heat.
- If you forgot to preheat the oven: This is a "start over" on timing — don't transfer the pan until the oven is fully at temperature. Keep the food warm in the pan on the lowest stovetop setting while the oven heats.
- The pan sauce while it rests: This is one of the most valuable 5 minutes in cooking. While the meat rests, put the pan back on medium heat, deglaze with a splash of wine or stock, scrape up every brown bit, reduce by half, and finish with a knob of cold butter. What you have is a restaurant-quality sauce built from what would otherwise be cleanup.
- Cold handle warning — a real trick: Tari, one of our readers, preheats the cast iron pan in a cold oven, then brings it up to temperature before moving to the stovetop. The pan heats evenly throughout rather than just on the bottom. Worth trying.
Control the Variables: How to Adapt This Technique
- Stovetop heat: Controls crust development speed. Medium-high is the standard — high enough for browning, controlled enough not to burn. Maximum heat risks burning the exterior before a proper crust forms. If smoke is excessive, lower slightly.
- Oven temperature: Controls how aggressively the interior cooks. 400°F is the reliable default. 425°F for bone-in or very thick cuts that need more heat to reach the bone. 375°F for more delicate proteins like fish or if you want more time to manage the result. I personally prefer 350°F — it takes a bit longer but gives you more control, especially if you're not hovering over the pan.
- Thickness of the cut: Directly determines the oven time. ¾-inch cuts may need only 4–6 minutes. 2-inch cuts may need 12–18 minutes. Uniform thickness across the cut matters as much as overall size.
- Pan material: Cast iron holds heat more consistently and creates more even browning. Stainless heats faster and gives you easier visibility of fond. Both work — don't use thin pans or nonstick at these temperatures.
- Resting time: Longer rest = more even final temperature throughout the meat and more juice retained when sliced. 5 minutes is the minimum. 10–12 minutes for anything over an inch thick is better.
- Fat type: High smoke-point oil (canola, avocado, grapeseed) for the sear. Butter for the baste — added after the flip, not at the start.
When to Use Pan Roasting — and When Not To
- Use it for: Any protein ¾ to 2 inches thick that you want browned on the outside and evenly cooked through. Bone-in chicken thighs, thick pork chops, steak, salmon, sea bass, duck breast, veal chops, scallops, lamb chops.
- Use it when: You want restaurant-level results in a single pan with no special equipment. Also ideal when you want to make a pan sauce from the same pan immediately after.
- Don't use it for thin cuts: A ½-inch chicken breast or a thin fish fillet is done on the stovetop before the oven has any work to do. Pan roasting these just overcooks them.
- Don't use it for tough braising cuts: Short ribs, pork shoulder, lamb shanks — these need low, slow, moist heat to convert collagen. Pan roasting can't do what braising does. The high heat will tighten and dry them out.
- Don't use it for very delicate fish: Thin sole or flounder fillets will fall apart during the transfer. These are better poached, steamed, or sautéed entirely on the stovetop.
- Do use it when you're unsure: If you're not sure whether something needs the oven to finish, pan roasting gives you the option. Build the crust, check the temperature, and decide. You're in control of the outcome.
Apply It: Pan Roasting Across Different Proteins
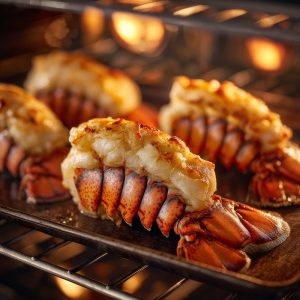
- Bone-in chicken thighs: Skin side down in the hot pan — most of the sear time goes here to render the fat and crisp the skin. 3–4 minutes stovetop, then 15–18 minutes in a 400°F oven. The skin should be deeply golden and pull away from the pan without tearing.
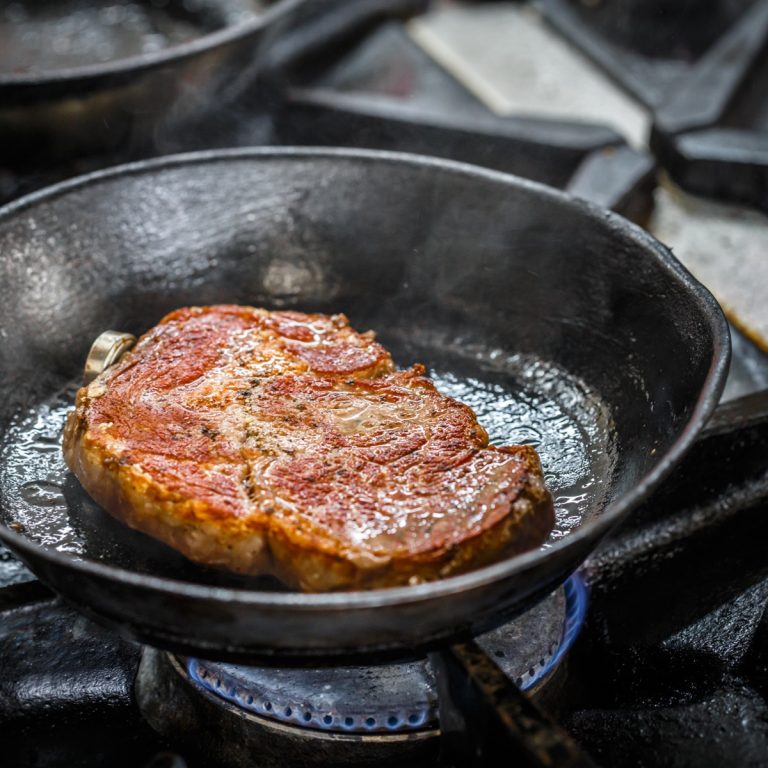
- Steak (1 to 1½ inches): 2–3 minutes per side on the stovetop for the crust, 4–8 minutes in a 400°F oven depending on thickness and desired doneness. Pull at 125°F for medium-rare. Rest 8–10 minutes.
- Thick pork chops: Pork is lean and dries out fast — pull at 140°F and rest immediately. A bone-in chop at 1½ inches needs about 3 minutes each side on the stovetop and 8–12 minutes in a 400°F oven.
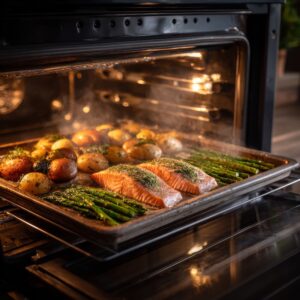
- Salmon fillet (skin-on): Skin side down in a medium-hot pan. Press gently for the first 30 seconds to prevent curling. 3 minutes stovetop, 5–7 minutes in a 400°F oven. Pull at 120–125°F — the center should be just barely translucent.
- Duck breast: Score the skin in a crosshatch pattern without cutting into the meat. Start skin-side down in a cold pan — the fat renders as the pan heats. Once the fat is rendered and the skin is golden, flip and transfer to a 400°F oven for 6–8 minutes. Rest skin-side up so it stays crisp.
- Large sea scallops: Dry them aggressively — they hold moisture and it kills the sear. Very hot pan, high-smoke-point oil, 90 seconds per side on the stovetop. A brief 2–3 minutes in the oven to finish through. The crust should be caramel-colored and the center barely set.
Pan Roasting Cheat Sheet
- Pan: Cast iron or heavy stainless. Oven-safe. Never thin, never nonstick at high heat.
- Oven temp: 400°F standard. 425°F for bone-in or very thick. 375°F for fish or more control.
- Prep: Room temperature protein. Completely dry surface. Season all sides.
- Stovetop: Preheat pan 2–3 min. Add high smoke-point oil. Sear without moving until food releases (2–4 min). Flip. Optional butter baste 30–60 sec.
- Oven: Transfer hot pan to preheated oven. Cook to temperature — not time.
- Target temps (pull 5°F early — carryover does the rest): Chicken 160°F · Pork 140°F · Beef medium-rare 125°F · Fish 120°F
- Rest: 5–10 min small cuts. 10–15 min larger cuts. Tent loosely. Don't skip.
- Pan sauce: Deglaze with wine or stock. Scrape the fond. Reduce. Finish with cold butter.
- Handle warning: It's hot coming out of the oven. Every time.
Great Examples of Pan Roasted Dishes
| Dish | Description | Why Pan Roasting Works |
|---|---|---|
| Pan Roasted Chicken Breasts | Juicy chicken breasts with a golden brown, crispy skin. Often finished with herbs and garlic butter. | Locks in moisture while creating a flavorful crust, preventing the breast from drying out. |
| Pan Roasted Sea Bass | Tender sea bass with crisp skin and delicate, flaky flesh. Often paired with a light pan sauce or citrus. | Quick sear followed by oven finish preserves the delicate texture while giving a perfectly crispy skin. |
| Pan Roasted Rabbit | Tender rabbit legs or loins seared to golden brown, often cooked with aromatic herbs and vegetables. | Adds rich flavor and seals juices, while oven cooking ensures even doneness without toughness. |
| Pan Roasted Butter Fish | Rich, buttery fish with a crisp exterior and soft, flaky interior. Often complemented by lemon or herb butter. | Highlights the fish's natural richness, while the oven finish ensures even cooking without breaking apart. |
| Pan Roasted Duck Breast | Crispy-skinned duck breast, juicy inside, often finished with a fruit-based sauce. | Oven finish ensures the interior stays tender while maintaining a crisp, flavorful skin. |
| Pan Roasted Pork Chops | Bone-in or thick-cut chops with a caramelized crust, often paired with apples or mustard sauce. | High heat sear locks flavor; oven ensures even cooking without drying out. |
| Pan Roasted Salmon | Crispy-skinned salmon, tender and flaky inside; often finished with herbs or a glaze. | Sear preserves skin crispiness while oven finish cooks fish evenly without overcooking. |
| Pan Roasted Lamb Chops | Lamb chops seared with rosemary and garlic; juicy, tender, and perfectly cooked inside. | Pan roasting ensures a flavorful crust while finishing in the oven guarantees even doneness. |
| Pan Roasted Scallops | Golden-brown scallops with tender, juicy centers; finished gently in the oven. | Quick sear adds flavor and color; oven ensures the delicate centers remain tender. |
| Pan Roasted Turkey Cutlets | Lean turkey cutlets with a crisp exterior and juicy interior; often finished with pan sauce. | Pan roasting locks in moisture while the oven finish prevents toughness. |
| Pan Roasted Veal Chops | Tender veal with a rich, caramelized crust and evenly cooked interior. | Pan roasting ensures flavorful browning while the oven cooks the veal evenly without drying. |
| Pan Roasted Tilapia or Cod | Firm white fish with a crispy exterior and tender, flaky inside; often served with light sauce or lemon. | Pan roasting preserves texture and flavor while cooking the fish evenly. |
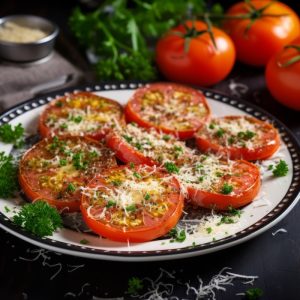
| Pan Roasted Vegetables | Thick-cut carrots, potatoes, squash, or root vegetables caramelized on the outside, soft inside. | Pan roasting enhances natural sweetness and texture while creating a lightly crisp, flavorful exterior. |
Explore More on This Topic
- Make a Quick Pan Sauce From the Same Pan — the natural next step after pan roasting. Everything you need is already in the pan.
- How to Tell When Your Pan Is Hot Enough — pan temperature is where most sears are won or lost before the food even goes in.
- Pan Roasted Chicken Breasts — the technique applied to one of the most common weeknight proteins.
- Pan Roasted Sea Bass — how the same method works on a delicate fish fillet.
- The Secret to Great Sautéing — the stovetop technique that shares the most DNA with pan roasting.
- Straight Oven Roasting — when to skip the stovetop sear entirely and go oven-only.
- How to Season Generously — the foundation skill that determines how much flavor survives the sear.
- Cook to Temperature, Not Time — the single habit that eliminates most pan roasting failures.
Frequently Asked Questions
What’s the difference between pan roasting and pan frying? Pan frying stays on the stovetop the whole time — you’re cooking in more fat, often flipping partway through, and the heat comes entirely from below. Pan roasting uses the stovetop only to build a crust, then finishes in the oven with heat coming from all sides. As one reader asked in the comments here years ago — and it’s a fair question — if you finish something in the pan rather than the oven, it’s pan frying, not pan roasting. The oven finish is what defines the technique.
What’s the best pan for pan roasting? Cast iron is the first choice — it holds heat more evenly and gives a consistent sear across the surface. Heavy stainless steel is the close second. What you’re looking for is mass — a heavy pan holds temperature when cold food hits it. A thin pan drops in temperature immediately, which kills the sear. Never use nonstick at the heat levels pan roasting requires.
Do I really need to bring the meat to room temperature first? It helps more than it hurts and costs you nothing but 20 minutes. Cold meat straight from the fridge lowers the pan temperature when it hits and takes longer to cook through, which increases the risk of an overcooked exterior with an underdone center. For thick cuts especially, the room-temperature step genuinely matters.
What oven temperature should I use? 400°F is the reliable starting point for most proteins. I personally like 350°F — it gives you more control and forgives inattention better than 425°F does. For very thick bone-in pieces, 425°F gets the heat through faster. For fish or anything you want to handle gently, 375°F gives you a bigger margin of error. Experiment on the same cut at different temperatures and see what works in your oven.
Can I pan roast vegetables the same way? Yes, with some adjustments. Dense root vegetables — potatoes, carrots, parsnips — work well. Cut them to an even thickness, sear the cut side down in the hot pan until caramelized, then finish in the oven until tender throughout. Leafy or high-moisture vegetables aren’t suited to this technique — they’ll steam rather than brown.
Why does my food stick to the pan? Usually one of two things. Either the pan wasn’t hot enough before the food went in, or the crust hadn’t finished forming, and you tried to move the food too early. A properly formed crust releases from the pan on its own. If it’s sticking, it’s not ready. Wait another 30–60 seconds and try again.
Can I use butter instead of oil for the initial sear? Not for the sear — butter burns at the temperatures you need for a proper crust. Use a high-smoke-point oil (canola, avocado, or grapeseed) to bring the pan to searing temperature, then add butter after the flip to baste. That’s when butter’s flavor contribution matters most anyway.
How do I make a pan sauce after pan roasting? While the meat rests, put the pan back on medium heat. Add a splash of wine, stock, or even water and scrape up every brown bit stuck to the bottom — that’s concentrated flavor. Let it reduce by about half. Pull the pan off the heat and stir in a knob of cold butter until it emulsifies into a glossy sauce. Season and pour over the rested meat. Total time: about 4 minutes.
7 Responses
Thanks for the tips! 🙂 Wondering – where’s the video you reference? Cheers!
FB
Seems to have been lost in the update but it should be there now. Thanks for letting me know. — RG
Any comments on finishing not in the oven, but right on the stove top? Any benefits/drawbacks? Particularly for something like chicken breasts. I suppose it may dry the outside more, but makes also makes for easier basting (just add butter, etc, and spoon over the meat).
Hi Ben, sure you can finish in the pan but then I wouldn’t call it pan roasting but pan frying. Saying that, I have read in one cookbook that pan frying is done completely on the stove-top and not in the oven so there is a difference in what people call it. This is why I find cookbooks sometimes confusing but in the end you can call it what you like as long as you understand the different techniques. – RG
Hi! Your recipe says – 350 degrees F, chef Ming says – 450. Which is it?
I personally like 350 degrees F because I can control the heat more. It may take a little longer but I would rather take the extra time than worry about it overcooking especially if I’m not paying as close attention as I should. I suggest you try 350, 400 and 450 on different occasions and decide what temp works best for you.
Thank you for posting this information. I am teaching myself!
Hi – this is one of my favorite techniques! I use a heavy cast iron pan for my filets – the trick to it for me is to put the cold pan in the cold oven and turn the heat to 400 degrees. The pan gets good and hot, (don’t forget your oven mitts!!!!), and i then transfer to stove top on high heat to keep it hot until i throw in the steaks on med-high. I sear the first side for a few minutes, then flip and sear for another few minutes, then place the entire pan back into the oven. We like medium-rare, so depending on thickness, i cook for 3-5 minutes on this side, then flip and do other side for 3-5 minutes. Let them rest in the pan, outside of the oven for a few minutes before serving. Perfect! And by the way, i usually marinate my steaks in the fridge for at least 30 minutes (several hours is ideal) in a bag with a bit of olive oil, S&P, worchestershire sauce, and any other seasonings of choice (herbes de provence is good; also, “Forward” seasoning from Penzeys!) I let them come to room temp for another 20-30 min.
Love your helpful hints and recipes and FB page!!
Best,
Tari
Tari, thanks so much for sharing your preferred method of getting your cast iron pans ready for filets. Great tips.